Overview

The only on-screen data leakage prevention software

The PriNIST Agent is lightweight software that you can install on supported endpoints. The PriNIST Agent gives you enhanced on screen protection to prevent intentional/unintentional data leakages, associate technology fraud, advanced malware attacks, endpoint intellectual property theft, state sponsored attacks and espionage scenarios. 


PriNIST is configured to comply with regulations & standards like CCPA, NIST, GDPR, HIPAA, ISO and PCI DSS 

Benefits

PriNIST provides organizations increased assurance against IP theft and data leakages

  1. PriNIST is a cloud-based (SaaS) solution that is easily deployable and manageable. Characteristically, the process features automation that makes PriNIST adoption intuitive and frictionless. The use of this solution does not get in the way of business productivity. 

  2. PriNIST is a lightweight software that combines the zero-trust principle and machine learning to detect illegal data exfiltration and provide advanced threat detection. 

  3. PriNIST is a highly customizable tool – the solution features granular controls that allow you to fine-tune exceptions based on various factors, including users or risk levels. 

  4. PriNIST also provides desktop content protection. 

  5. PriNIST supports and meets several security standards and frameworks, including LGPD, ADPR (Australia), CCPA, GDPR, GLBA, HIPAA, HITRUST, ISO 27001 & ISO 27701, NIST, PCI DSS, PDPA (Singapore), PIPEDA (Canada), POPI, and SOX. 

  6. PriNIST can be deployed in private networks and endpoints. Users will not experience any considerable changes in computer performance after installing PriNIST.  

PriNIST is an innovative and artificial intelligence-based enhanced data protection solution, which is the “Missing Piece” in current DLPs and end point protection solutions. 

How PriNIST Agent Works

Simple agent installation provides long-term support

PriNIST is a client server technology software that has two components:  

1. PriNIST Server 
2. PriNIST Agent 

PriNIST Server 

PriNIST server is an Artificial Intelligence based solution that understands and recognizes your home grown and used applications and provides detailed inputs to administrator and to take required actions for each application.  
PriNIST server allows administrators to customize and provide granular commands to agents on which applications to be protected.  
PriNIST server also has an exception mechanism which can be used to provide an exception for certain protected software to a specific user for a specified period of time.

PriNIST Agent 

PriNIST Agent must be installed in supported endpoints using a mass deployment tool or manual installations.  
On Installation, PriNIST agent receives instructions from PriNIST server regarding which applications to be protected. 

 Based on various custom actions, PriNIST Agent applies protection to specified software. 


Connectivity Requirements

Whitelist: https://*.prinist.com | https://www.coesecurity.com

PriNIST SaaS Solution

The PriNIST Agent communicates with its SaaS platform through specific channels that allow the transfer of specific data, in a safe and secure manner. To ensure all data exchanged between PriNIST Agent and Server, configure your endpoints/networks to the following hosts:

https://www.prinist.com 
https://*.prinist.com
https://api.prinist.com 
https://www.coesecurity.com


PriNIST On-Premise or self hosted solution. 

The PriNIST Agent must connect to its server regardless of where it is hosted (internally or on a private cloud). Please make sure that you whitelist those IP addresses/domains.  

Domain resolution for On-Premise of self hosted solution

PriNIST Agent must require a resolvable (internally or on VPN) domain name to function as expected. 
 

Endpoint Protection Software Requirements

Sometimes, you may be required to allow the PriNIST Agent within your Endpoint Protection Software(from the allow list)

Many Endpoint Protection Software is an umbrella of applications that can be deployed on endpoint devices to detect and block malicious activities from both trusted and untrusted applications.

Endpoint security applications (such as McAfee Threat Intelligence Exchange, CylancePROTECT, Carbon Black, and others) may flag, block, or delete the PriNIST Agent from your assets depending on your detection and response settings. To prevent this and ensure the successful operation of the PriNIST Agent, you have to allowlist the Agent in the Endpoint Protection Platform you have deployed in your environment.

Allow-list the PriNIST Agent within your Endpoint Protection Software

To allowlist the PriNIST Agent, navigate to your Endpoint Protection Platform and set up a path exclusion rule for the agent directory.
Your rule must accommodate all subdirectories contained in the agent installation path. The following paths show default agent installation locations by operating system:
Windows - C:\Program Files\PriNIST

How to allow-list PriNIST Agent in Carbon Black

  1. Log into the Carbon Black Cloud Console and go to Enforce>Policies. Specifically select the PriNIST Agent and click on prevention tab. 
  2. Add permission and click on “Add application path”. Enter the exclusions. By default, the agent will be installed under the following directories. [ Windows - C:\Program Files\PriNIST ]
  3. After adding the Agent path, make sure to select the ‘bypass’ option for performing any operations. 
  4. Click on "Confirm". 

For more details, please consult Carbon Black documentation

How to allow-list PriNIST Agent in CylancePROTECT

  1. Login into the CylancePROTECT Console and change the protection settings for the devices you want to deploy the Agent in. 
  2. Ensure that the new protection setting excludes the correct installation location along with all the subdirectories. By default, the agent will be installed under the following directories: 

           Windows - C:\Program Files\PriNIST 

For more details, please consult CylancePROTECT documentation

Supported Operating Systems

PriNIST supports almost all Windows 10 endpoints

The PriNIST Agent software receives regular updates (including new features, improvements, protected software, instructions and bug fixes) designed to maintain agent’s performance for all supported OS versions. Running the agent on a supported version ensures that the agent software continues to receive these updates. PriNIST Customer Support team can also assist you with any questions and troubleshoot any issue that arises with the agent installed on a supported OS version. 

The PriNIST agent supports almost all versions of Windows 10 and can also be deployed in unsupported versions with limited support. 

Name

Version

Build

Architecture

EOL for PriNISTAgent Support

  Windows 11*

21H2

22000.376

x86-64

Jan 13, 2032

Windows 10

21H2

19044.1319

IA-32, x86-64

Jan 13, 2032

Windows 10

21H1

10.0.19043

IA-32, x86-64

Jan 9, 2029

Windows 10

20H2

10.0.19042

IA-32, x86-64

Jan 9, 2029

Windows 10

20H1

10.0.19041

IA-32, x86-64

Jan 9, 2029

Windows 10

19H2

10.0.18363

IA-32, x86-64

Jan 9, 2029

Windows 10

19H1

10.0.18362

IA-32, x86-64

Jan 9, 2029

Windows 10

v1809

10.0.17763

IA-32, x86-64

Jan 9, 2029

Windows 10

v1803

10.0.17134

IA-32, x86-64

Oct 13, 2026

Windows 10

v1709

10.0.16299

IA-32, x86-64

Oct 13, 2026

Windows 10

v1703

10.0.15063

IA-32, x86-64

Oct 13, 2026

Windows 10

v1607

10.0.14393

IA-32, x86-64

Oct 13, 2026

Windows 10

v1511

10.0.10586

IA-32, x86-64

Oct 14, 2025

Windows 10

v1507

10.0.10240

IA-32, x86-64

Oct 14, 2025


*Windows 11 has limited support for specific applications.*

Installation

PriNIST is a simple agent that can be deployed using your favorite mass deployment tools

You can install the PriNIST Agent on your target assets using one of two distinct methods.

1. Using Microsoft System Center Configuration Manager
Please refer to Mass Deploy section for detailed instructions

2. Support assisted installation
A support specialist can install the agent on target systems by manual methods

Download

PriNIST Agent is fully customizable and can be tuned according to your organization’s requirements

To download the installer, you have to follow the below mentioned steps:

  • Go to ‘PriNIST Dashboard’ and sign in with your account details: geographical region, company code, email and password.

 [Note: The company code will be unique for each company.

  • Select "Request Agent" from the screen that is displayed. 
  • When you select "Request Agent", the system will ask for the details mentioned below, please provide appropriate information:  

For SaaS Service

  • Select the compliances you need to follow from the drop-down menu. 

         [for example: ISO 27001, ISO 27701, GLBA, GDPR, PCI etc.] 

  • Select your operating system environment. 
  • Provide your internal support URL example: https://internal.jira.com.  This is required for redirecting users to create exception tickets. 
  • Provide your Geographical region [for data localization perspective].  
  • Provide a time interval that decides how often your PriNIST agent should connect to its server to receive updates like exceptions. 

       [Time intervals cannot be changed unless a new agent is requested.] 

  • Provide a time interval of how often the PriNIST agent should send software list and hardware information to server. 
  • Decide how regularly the PriNIST should look for protected software in the system and apply protection. 
  • Then click on ‘request an agent’. 

For On-Premise Service

  • Provide appropriate information for the details mentioned above (for SaaS service) 
  • Provide a Base URL.  

          [Base URL is the address where agents should connect to the domain.] 

          Example: https://internal.yourcompany.com   

  • Then click on request an agent. 
  • Once the PriNIST agent is provisioned with information, you will be notified via email or other one-way communication channels.  
  • Log into your PriNIST dashboard. Create an admin request. (After it is approved) 
  • Click on ‘Create Agent Request’, now you need to select the software that you would like to protect from the list of global softwares given. 

[Note: This is initial configuration and you can change the software later at any point of time] 

  •  Download the PriNIST Agent. 

Next Steps

Now, the installer is in place and you are ready to move on to the installation phase. We recommend scheduling a meeting with PriNIST support team for a seamless experience. 


Support

We appreciate your interest in our product. Please leave us a message here. We will contact you as soon as possible.

PriNIST release notes


Updates

Updates on prinist

New Added

The information should be developed in the way as Customer can undersand 

Bug Fixes

The information should be developed in the way as Customer can undersand 


March Release Notes

#

New Added

#

Bug Fixes

#


April Updates(Gaurang)

April updates across our stack, the main focus for this month in regards to what was released is around: Migrating all companies to new access control Migrating all companies using ticket deflection to the new system Further improving system, and allowing you to compare your results against wide averages for deflection rates

New Added

  • Better support for using applying additional filters to posts_tax_query for categories for custom WordPress syncs
  • Reporting fine-tuning for speed improvements (up to 60% improvement in latency)
  • Search engine upgraded. Bringing with it enhancements and bug fixes.
  • Replaced login / registration pre-app screens with a cleaner design

Bug Fixes

  • Fixed an issue with the sync autolinker only interlinking selectively.
  • Fixed up an issue with prematurely logging out users

Microsoft SCCM

Simple deployment using SCCM

Microsoft System Center Configuration Manager (SCCM)

You can use your Microsoft System Center Configuration Manager (SCCM) tool to mass deploy the PriNIST Agent to a collection of Windows operating systems in your organization. This article will guide you through the configuration and deployment procedure. 

Before you can mass deploy the agent, you need to create a Device Collection in SCCM that specifies which Windows systems will be included in the package distribution. 

CREATE A DEVICE COLLECTION

To create a Device Collection in SCCM:

  1. In your SCCM interface, click the “Assets and Compliance” tab on your left navigation menu. 
  2. Expand the Overview dropdown and click on “Devices”. Verify that all your intended assets are online and reachable. [The online state is indicated by a green mark over the device icon.] 
  3. After verifying that all your intended assets are online, right-click on “Device Collections” in the left navigation menu and click on “Create Device Collection”. 
  4. Give your Device Collection a name and a comment to describe its function. 
  5. Click on “Browse” next to “Limiting collection” to determine which systems are available to choose from [“All Systems” option or whichever is suitable according to your needs]. Click on “OK” and then “Next” to advance to “Membership Rules”. 
  6. Click on ‘Add Rule’ to determine how your Device Collection adds new members (according to your organizational requirements). Possible options include Direct Rule, Query Rule, Include Collections, and Exclude Collections. Click on “Next” when finished. 
  7. Verify that all your intended devices are included by the rule or rules you configured for the Device Collection. Close the wizard when your Device Collection is completed successfully. 

Now that your Device Collection is in place, you need to create the Application that will hold the Insight Agent installer.

CREATE AN APPLICATION

To create an Application for the PriNIST Agent installer in SCCM:

  1. In your SCCM interface, click the “Software Library” tab on your left navigation menu. 
  2. Expand the Overview dropdown, then expand the Application Management dropdown. Right-click “Applications” and click on “Create Application”. 
  3. Give your application a name and a comment to describe its function. 
  4. Click on ‘Browse’ next to “Installation program” to locate the Insight Agent .msi (files packed in archive-file format) that you intend to send to targeted assets in your Device Collection. [Note that the .msi (or any necessary configuration files) that you select to deploy using the certificate package edition of the Insight Agent installer must be on a network that your server can access.] 
  5. Click through the remaining steps of the application wizard without any changes. 

DEPLOY THE APPLICATION

After your application is successfully created, you can deploy the Application to the assets in your Device Collection. .

To deploy the Application:

  1. Right-click on your Application and click on Deploy. The “Deploy Software Wizard” window displays.
  2. Click on Browse next to “Collection” to select the Device Collection that you created earlier, then click on Next.
  3. Set the “Deployment Settings”  as required:
    • Available - The program will appear in the SCCM Software Center of the target PC, but will not install until the user clicks Install.
    • Required - The program will install without any action from the user.
  4. Click through the remaining steps of the deployment wizard without changes.

Your new Device Collection will have the Insight Agent available for installation according to the refresh cycle of their respective SCCM Software Center. Depending on the deployment settings (mentioned above), the installation will take place automatically or will require user action. 

To install silently

msiexec.exe /i Setup.msi /qn

To Uninstall silently

msiexec.exe /x Setup.msi /qn

Note: Change Setup.msi to name-of-the-setup-file that you are installing  

(Example: yourorg.msi)  

CHECK AGENT INSTALLATION STATUS

To verify that the agent was installed correctly:

  1. In one of your target assets, click Start > Run. 
  2. Enter services.msi and click OK. 
  3. Check that the PriNIST Agent service is present and running. 

Deployment Process

Steps to deployment

Step-1 

  Onboarding the on-premise customer 

  • With the help of base URL of the customer 
  • Generating a downloadable link 

Step-2  

  Prerequisites 

  • AWS instance/Azure instance/On-premise instance 
  • Linux/Unix OS  
  • Bitnami LAMP Server 
  • A valid domain name 
  • A valid SSL certificate 

Step-3 

   Below given are the commands to deploy the code to the server. 

cd htdocs

wget https://state.ntheye.com/Archive.zip  (downloadable link sent to email)

unzip Archive.zip  (downloadable file name)

sudo chmod -R 777 writable/ 

sudo chmod -R 777 assets/uploads/

sudo chmod -R 777 app/Config/*

composer require dompdf/dompdf


Step-4

   Database Configuration

  •    You will be directed to the welcome page after you provide the required details. 


  •     After validating the credentials, the installation process will start. 


  • After installation process is completed, you will be redirected to the admin login page. 


Factory Reset

Steps to uninstall

Step-1 

  • Login to the super admin dashboard 

Step-2 

  • Click on the reset button (the admin will receive the OTP through an email) 


  • Enter the OTP in the pop-up shown below. 


  • The uninstallation process will start after you click on confirm.       


  • You will be redirected to the welcome page after the uninstallation process ends. 

Workaround App Support – Windows 11

Workaround App Support – Windows 11


Here are the steps for the workaround.

Install Windows ADK: Download and install the Windows ADK | Microsoft Docs 

  1. Start Compatibility Administrator. 
  2. Select “File” then click on new menu item to create a new custom compatibility database file. 
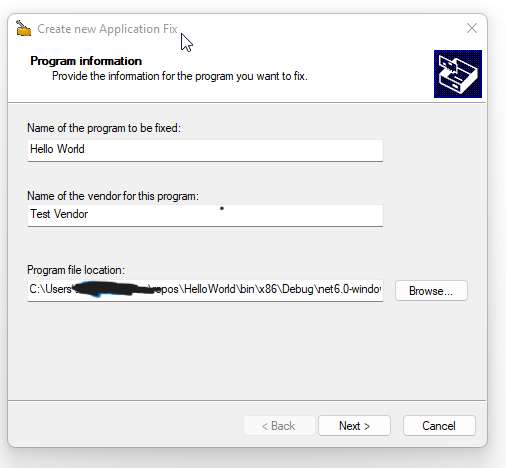
  3. Select Database>Create New>Application Fix, which will display the “Create new Application Fix” wizard. Mention the issue to be fixed and then click on “Next”. The following screen shot demonstrates using HelloWorld.exe(An app that don't work with PriNIST).

211900-create-new-application-fix.png

4.Select the desired compatibility modes, then click on “Next”. 

 [No compatibility modes are needed in this scenario.] 

211898-commodes.png

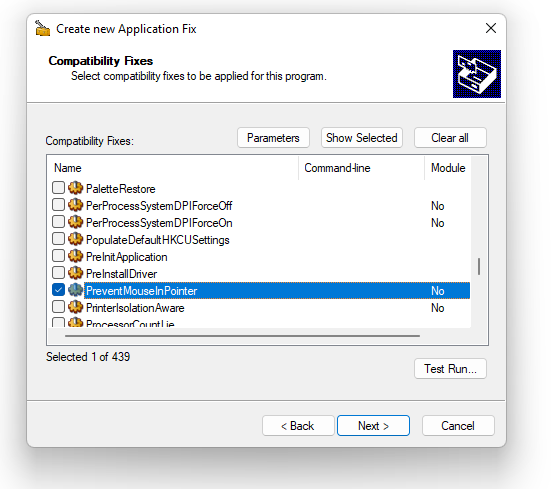
5.Select the Prevent Mouse in Pointer compatibility fix, then click on ‘Next’. 

211987-fixes.png


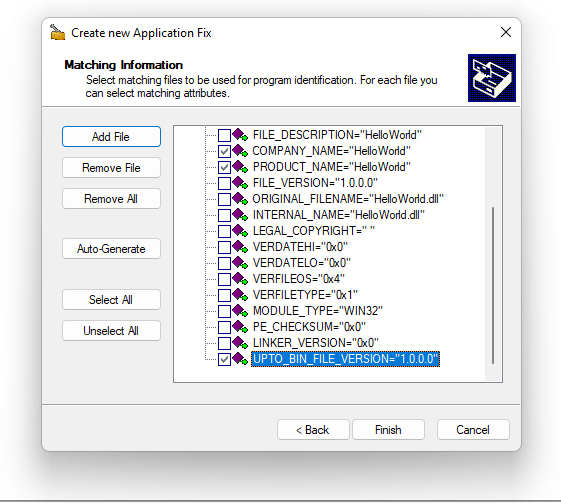
6.Select the options to determine whether to apply the Prevent-Mouse-I-Pointer fix to the application, then click on “Finish”. Here the COMPANY_NAME, PRODUCT_NAME and UP_TO_BIN_FILE_VERSION options are selected. 

211909-match.png

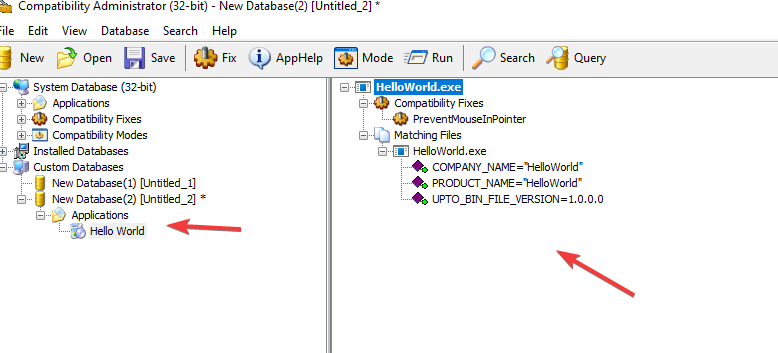
7.The Compatibility Administrator will then display content similar to the following: 

211899-display.png

8.Repeat steps 3 to 6 for other excludable(s) to the custom compatibility database if needed.  

9.Select File>save menu item then provide a name to the custom compatibility database and path (or name to the .sdb file). 
212002-image.png

10.You can then use Compatibility Administrator to install the .sdb file (File>Install menu item), or specify the fill path to the .sdb file as a command line argument to the sdbinst.exe command-line tool. 

Example: sdbinst c:\pathToSdbFile\HelloWorld.sdb
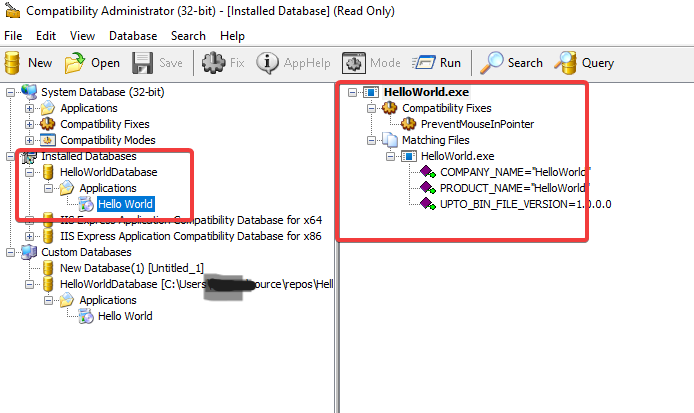
Compatibility Administrator will then show the custom compatibility database under the Installed Databases.  


212011-123333.png


Then go to: https://docs.microsoft.com/en-us/windows-hardware/get-started/adk-install 

or else go to : https://learn.microsoft.com/en-us/answers/questions/700122/setwindowdisplayaffinity-on-windows-11

Overview
Requirements
Agent Installation Requirements
Mass Deployment Process
Support
Onpremise Deployment